
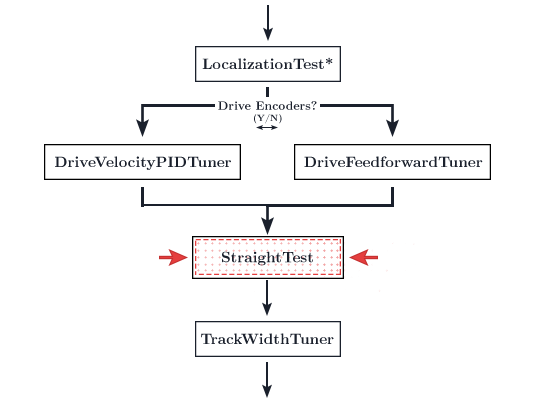
# Straight Test Tuning
WARNING
If you are utilizing drive encoder localization (no dead wheels), you must follow the drive encoder localization step below. This section is important for drive encoder localization tuning.
Once you've got your velocity controller tuned, you should run a quick straight test just to make sure everything is working properly.
Run the
StraightTestopmode via the RC.Measure the distance the bot traveled.
The distance traveled should be 60 inches by default.
- You can change this distance in Dashboard or through the opmode directly
- If you'd like to change it in Dashboard, find the
StraightTestdropdown in the variable configuration sidebar on the right. Change theDISTANCEvalue. - If you'd like to change it directly in the opmode, open the
StraightTest.javafile and change theDISTANCEvariable on line 17.
- If you'd like to change it in Dashboard, find the
- You can change this distance in Dashboard or through the opmode directly
Run the
StraightTestopmode like 2 or 3 times to ensure that the distance traveled is consistent within 1-3% of your specifiedDISTANCE. If not, your velocity controller requires further tuning. It does not need to hit the exact spot each time as you will later enable closed loop feedback using localization. We're looking for consistency in this step.- Your bot may drift a little to one side. Just ignore this for now. This will be corrected once the heading and translation PIDs are enabled in later steps.
WARNING
IF YOU ARE USING FEEDFORWARD INSTEAD OF DRIVE VELOCITY PID
There is a good chance that your bot will overshoot your specified distance by around 10-15%. This issue is exacerbated the faster your drive train. This is due to the REV Hub motor controller's poor deceleration control. You are free to ignore this problem at this step. Tuning the translational PID during the FollowerPID tuning phase will hopefully correct for this issue. kD will act as a P-controller for velocity thus curtail this issue somewhat. kP will hopefully further ameliorate this issue. However, if the translational PID does not entirely correct for this overshoot and causes oscillations towards the endpoints, it may be auspicious to reduce kV so that your bot does not overshoot. See the footnote at the bottom of the page for further information on this.
- If everything works great, move on to the next step!
# Tuning Lateral Multiplier - Dead Wheels
WARNING
Disregard this section if you are using drive encoder localization (no dead wheels).
TIP
This isn't absolutely necessary (if you are using dead wheels). However, due to the nature of mecanum kinematics, a mecanum drive does exhibit less torque while strafing. Thus, the feedforward may require some slight compensation. If you skip this step, the translational PID will most likely pick up any discrepancy and you may not notice it at all. However, if you do see some undershooting while strafing, you will be interested in applying a lateral multiplier.
See this paper (opens new window) for more details on the strafing inefficiency.
- Run the
StrafeTestopmode via the RC. - This opmode will strafe right at the specified distance. You are free to change the code to strafe left.
- The distance traveled should be 60 inches by default. However, it may undershoot. If so, measure the distance traveled.
- Take your target distance (60 inches by default) and divide it by the actual distance traveled.
- Set your
LATERAL_MULTIPLIERinSampleMecanumDrive.java(line 57) to this value. - Run the
StrafeTestopmode again and now it should go the correct distance.
# Drive Encoder Localization
If you are using drive encoder localization (no dead wheels), you will need to tune your localization in the StraightTest and StrafeTest steps.
# Straight Test
- Run the
StraightTestopmode. The opmode will print the x and y distance traveled once finished. - Your bot may drift to one side. This will be fixed later once translational and heading PID is enabled.
- Measure how far your bot travels during the
StraightTest(with a tape measure). Then compare the measured value with the telemetry'sfinalXvalue. - If the reported
finalXvalue does not match up with the measured distance, multiplyGEAR_RATIOinDriveConstants.java(or in the variable sidebar for testing) bymeasured distance / reported x value. - You may want to do this more than once to fine tune the localization. Even a 1% increase in accuracy makes a difference.
# Strafe Test
- Run the
StrafeTestopmode. The opmode will print the x and y distance traveled once finished. - Your bot may drift forward or back quite a bit. This will be fixed later once translational and heading PID is enabled.
- Measure how far your bot travels during the
StrafeTest(with a tape measure). Then compare the measured value with the telemetry'sfinalYvalue. - If the reported
finalYvalue does not match up with the measured distance, set theLATERAL_MULTIPLIERvariable inSampleMecanumDrive.java(or in the variable sidebar for testing) toreported y value / measured distance. - You may want to do this more than once to fine tune the localization. Even a 1% increase in accuracy makes a difference.
# Troubleshooting
# Does your straight test go backwards or turn in a circle?
Reverse your motor directions. Instructions on where to do this can be found here.
# Is your straight test consistent but it doesn't travel the specified distance?
Check your DriveConstants.java file. Something went wrong in here. One of these constants may be directly related to the problem:
TICKS_PER_REV- check the encoder ticks and make sure that it corresponds with the spec sheetMAX_RPM- check the max rpm and make sure that it corresponds with your motor's specced rpmWHEEL_RADIUS- this should match your drive train's wheel radius. Make sure this isn't diameterGEAR_RATIO- if this is 1:1 dont worry about it. Make sure your ratio is output:input instead of reversed
# Does your bot strafe the wrong direction?
Your top and bottom motors are reversed. Ensure that your bot's motors follow the directions specified in goBILDA's wheel direction chart. Problems with strafing or turning direction are originated in a broken motor configuration (your motors aren't plugged into the specificed port, etc).
Refer to the Motor Direction Debugger opmode (opens new window) if you are struggling to debug your motor config. The Motor Direction Debugger allows you to run your motors one by one. Remove the @Disabled lin on line 41 and follow the directions in the opmode comments. Use this to diagnose your motor config problem and fix appropriately.
# Constant ~10% Overshoot
As mentioned prior, the REV Hub's motor controller has issues decelerating properly. This makes it impossible to properly tune the feedforward on the deceleration phases (when the velocity moves toward zero). This causes an overshoot every time. If you seem to be exhibiting a 10% overshoot, that is to be expected from the poor deceleration. Simply ignore it and move forward. The follower PIDs will take care of the issue. Ensure that you set kD to a non-zero value in the follower PID tuning steps.
TIP
On reducing kV to reduce overshoot: This will be detrimental to the extent of which your bot is able to accurately follow the specified motion profiles. However, we may excuse this imprecision through the justification that endpoint following accuracy is more relevant than the accuracy of following during the rest of the path. We are hoping that the closed loop feedback will fix any issues during the rest of the following. Reducing kV to offset this overshoot will affect the rest of the motion profile accuracy, especially the coasting phase. However, chances are with the fast ratios that this issue tends to be prevalent in, you're not actually spending a significant amount of time coasting. Thus the acceleration/deceleration phases are more important. So reducing kV should be fine.