# Trajectories Overview
# Trajectories vs Paths
Just as a clarification, Road Runner has two types of data structures for constructing your routes: paths and trajectories. Paths are what one would expect them to be. They simply hold the entire route built by the waypoints you define. These routes can be simple straight lines or smooth splines. Trajectories are paths with motion profiling. This means that they also map what velocity your bot should be throughout the entire route. This allows one to control the acceleration, velocity, angular acceleration, etc. As it is right now, Road Runner does not package a path follower for holonomic drive. It does include Ramsete path following for tank drive. The addition of a holonomic guided vector field follower will allow for path following with holonomic drives. Check out the FTC Discord (opens new window) for further details on that. Road Runner does include PIDVA trajectory followers for both holonomic and tank drive. This is what the quickstart utilizes by default.
# Vectors and Poses
Because you will be utilizing them quite a bit, we're going to define the two Road Runner classes used to represent position.
# Vector2d
Represents a 2d vector: an X and Y coordinate.
// Create a vector at coordinate (10, -5)
Vector2d myVector = new Vector2d(10, -5);
# Pose2d
Represents a 2d robot pose: and X and Y coordinate, and a heading.
Generally, this represents the robot's position and direction it faces.
Remember that increasing the angle goes counter-clockwise, just like any unit circle you've learned about in trigonometry.
Keep this in mind as the turn function will go counter-clockwise.
Also remember that any representation of an angle should be in radians. This is why we use the Math.toRadians() function to convert from degrees to radians.
// Create a pose at coordinate (10, -5) facing 90 degrees
Pose2d myPose = new Pose2d(10, -5, Math.toRadians(90));
# Building a Trajectory
We're going to assume you're using the road-runner-quickstart repo. If not, the gist of everything is still the same. You just have to ignore the SampleMecanumDrive.java helper functions.
It's quite trivial if you want to figure out how to use it without the quickstart if you choose to go your own route.
You may have already gotten the gist of how to write your own trajectory through the tuning opmodes. Here is a basic sample:
public class MyOpmode extends LinearOpMode {
  @Override
  public void runOpMode() {
    SampleMecanumDrive drive = new SampleMecanumDrive(hardwareMap);

    Trajectory myTrajectory = drive.trajectoryBuilder(new Pose2d())
        .strafeRight(10)
        .forward(5)
        .build();

    waitForStart();

    if(isStopRequested()) return;

    drive.followTrajectory(myTrajectory);
  }
}
Let's go through this step by step.
SampleMecanumDrive drive = new SampleMecanumDrive(hardwareMap);
There, we simply declare the SampleMecanumDrive object included in the quickstart and pass in the hardwareMap from the opmode.
Trajectory myTrajectory = drive.trajectoryBuilder(new Pose2d())
  .strafeRight(10)
  .forward(5)
  .build();
This is your main trajectory building interface. We create a Trajectory object named myTrajectory.
We do so by calling the trajectoryBuilder() function from drive. This just automatically passes in our constraints.
We pass in a starting pose: new Pose2d(). This is the same as doing new Pose2d(0, 0, 0), so creating a pose at x: 0, y: 0, and heading: 0 degrees.
What we're saying is that we want to assume the bot starts at the center of the field facing straight (we'll discuss the coordinate system later).
If you want to set your starting position to something else, say x: 5, y: -4, at a 90 degree turn, you would replace new Pose2d() with new Pose2d(5, -4, Math.toRadians(90)).
Notice the lack of semicolon at the end of the drive.trajectoryBuilder() line. That means that line doesn't actually end there. The entire line is actually the same as this:
Trajectory myTrajectory = drive.trajectoryBuilder(new Pose2d()).strafeRight(10).forward(5).build();
However, we prefer to enter a new line to keep everything clean.
Trajectory myTrajectory = drive.trajectoryBuilder(new Pose2d())
  .strafeRight(10)
  .forward(5)
  .build();
Next, notice the .strafeRight(10) and .forward(5) functions. We are telling the trajectory that we want to strafe right 10 inches, then go forward 5 inches.
The TrajectoryBuilder object utilizes something called a builder pattern (opens new window) that allows us to method chain (opens new window).
This means that we can keep chaining differents methods, infinitely, to keep building up our trajectory. Check out the TrajectoryBuilder Function List for more options.
Trajectory myTrajectory = drive.trajectoryBuilder(new Pose2d())
  .strafeRight(10)
  .forward(5)
  .build();
Finally, take a look at the build() function. The trajectoryBuilder() function doesn't actually return a Trajectory object. It returns a TrajectoryBuilder object which allows us to do the fancy method chaining and builder pattern.
We turn that TrajectoryBuilder into a Trajectory by calling the build() function. This will run through everything you built, double check everything, validate the trajectory, and then return your built Trajectory object.
waitForStart();

if(isStopRequested()) return;

drive.followTrajectory(myTrajectory);
We're going to ignore the the first 3 lines as those are standard FTC Opmode procedures. Notice the drive.followTrajectory(myTrajectory) function. Essentially, we take our trajectory and tell our bot to follow it.
Pretty self explanatory. At that point, the bot will try to follow the entire trajectory.
That's it right? Well, not quite. if you run that trajectory as-is, it's actually going to break. It'll throw a PathContinuityException error. Learn more about those below.
# Path Continuity Exception
So you go to run your cool new trajectory you just made.
drive.trajectoryBuilder(new Pose2d())
  .strafeRight(10)
  .forward(5)
  .build();
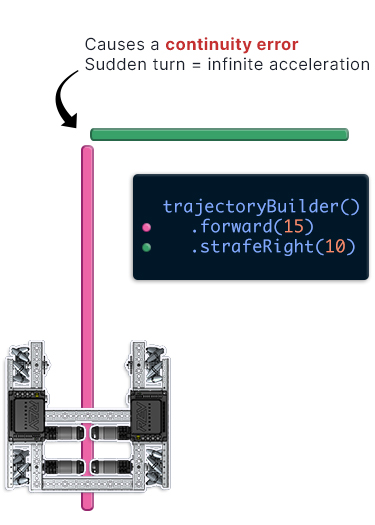
Sadly, your program crashed and you run into a PathContinuityException error. Why is that??
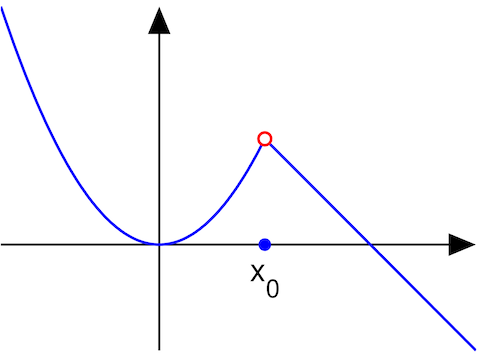
Well, you've run into a continuity error. What does this mean? If you harken back to the old days of pre-calculus or algebra 2, you may have covered discontinuities (opens new window). If you haven't taken either of those classes yet, you will eventually cover them.

Road Runner wants a continuous path for motion profiling purposes. This isn't just a Road Runner quirk. Any motion profiling system (FTCLib/WPILib) will want to enforce continuity.
When Road Runner throws that PathContinuityException, your path is no longer continuous. This means that it takes a sudden jump in velocity or position. This can only happen in cases of infinite velocity or acceleration, obviously not possible in the real world.
Motion profiling generates the exact path you need to take. Therefore, all the trajectories you create must follow the laws of physics and be continuous.

When looking at the path above, your bot physically cannot follow that exact path. Imagine the bot moving along that path in your head. It gets towards the edge the of pink line at full speed and it wants to suddenly strafe right. However, it still has momentum upwards so it'll make an arc instead of making that exact right turn. Instantly strafing right would require an instanteous change in velocity. Even if you had rocket boosters on your bot, it would still make a slight arc. To follow that path exactly, it needs to decelerate, or slow down, towards the end of the pink path and come to a full stop to shed any forward momentum. Then, it is able to make that right strafe.
So what do we do? There are two options:
- Split your path into two separate trajectories
Trajectory traj1 = drive.trajectoryBuilder(new Pose2d())
  .strafeRight(10)
  .build();

Trajectory traj2 = drive.trajectoryBuilder(traj1.end())
  .forward(5)
  .build();

drive.followTrajectory(traj1);
drive.followTrajectory(traj2);
This method is completely viable and there is nothing wrong with it. However, it will decelerate at the end of each path. So your bot with first strafe right, slow down, stop, and then go forward. It will not smoothly transition from strafing right to going forward. This takes longer as your bot will have to keep stopping and accelerating on each path. Check out the Running Multiple Trajectories section to ensure that you're doing this correctly.
- Use spline paths to retain continuity
This is the more optimal method of creating multi-part paths. Spline paths allow you to retain continuity and smoothly transition into other movements. The only quirk is that splines can make odd shapes if you don't understand how to use them correctly. It is highly recommended to run all your paths through a path visualization tool. Check out the TrajectoryBuilder Function List to see all your options.
Trajectory traj = drive.trajectoryBuilder(new Pose2d())
  .splineTo(new Vector2d(x1, y1), heading)
  .splineTo(new Vector2d(x2, y2), heading)
  .build();

# Set Pose Estimate
WARNING
MAKE SURE TO DO THIS BEFORE RUNNING YOUR OWN OPMODES
Before you follow your trajectory in your opmode, your localizer's position has to match up with your motion profile's location. By default, your localizer's position is set to x: 0, y: 0. However, if you define a custom start pose for your motion profile your localizer's location will be out of sync and you will notice weird behavior in your following. Your bot will probably start moving in some random line. This is because the translational/heading PID tries to compensate for this disparity. You won't notice this if you don't have translational/heading PID on.
Be sure to add drive.setPoseEstimate(new Pose2d()) to your opmode, before your first motion profiling matching its start pose.
E.g.
public void runOpMode() {
  SampleMecanumDrive drive = new SampleMecanumDrive(hardwareMap);

  // We want to start the bot at x: 10, y: -8, heading: 90 degrees
  Pose2d startPose = new Pose2d(10, -8, Math.toRadians(90));

  drive.setPoseEstimate(startPose);

  Trajectory traj1 = drive.trajectoryBuilder(startPose)
      .splineTo(new Vector2d(20, 9), Math.toRadians(45))
      .build();

  Trajectory traj2 = drive.trajectoryBuilder(traj1.end())
      .splineTo(new Vector2d(20, 9), Math.toRadians(45))
      .build();

  drive.followTrajectory(traj1);
  drive.followTrajectory(traj2);
}
drive.setPoseEstimate() need only be called once before the first trajectory.
# Running Multiple Trajectories
Even if you are running spline paths to ensure continuous paths, you will eventually need to run a second trajectory. A trajectory represents a continuous movement and should end when your bot comes to a halt. If your bot goes back and forth, each movement that the bot comes to halt or reverses direction should be its own trajectory.
How to run multiple trajectories:
Trajectory traj1 = drive.trajectoryBuilder(new Pose2d())
  .strafeRight(10)
  .build();

Trajectory traj2 = drive.trajectoryBuilder(traj1.end())
  .splineTo(new Vector2d(5, 6), 0)
  .splineTo(new Vector2d(9, -10), 0)
  .build();

Trajectory traj3 = drive.trajectoryBuilder(traj2.end())
  .splineTo(new Vector2d(5, 6), 0)
  .splineTo(new Vector2d(9, -10), 0)
  .build();

drive.followTrajectory(traj1);
robot.dropServo();
drive.followTrajectory(traj2);
drive.followTrajectory(traj3);
There are a few things to notice here.
- When making trajectories that call one after each other, the starting pose of the following trajectories should be the previous trajectory's
end()value. - Generate all your trajectories before calling any of the
followTrajectory()functions. Generating a trajectory takes like half a second and if you generate them on the fly you will notice a slight pause between your paths. - Notice the
robot.dropServo()function. Eachdrive.followTrajectory()function is synchronous. This means that the opmode won't move on to the next line until that trajectory is done following. Sorobot.dropServo()will be called after the first trajectory is finished. Then it will follow the second trajectory afterrobot.dropServo()is finished. If you want to follow trajectories asynchronously, check the advanced section for further details.
# Trajectories vs Turns
The SampleMecanumDrive.java class provided by the quickstart supports a turn() function. However, this turn() function is actually not part of the Road Runner core itself. It is simple a turning motion profile generated in the SampleMecanumDrive.java class.
Thus, it can not be called in a trajectory. Treat it as a method similar to followTrajectory().
drive.followTrajectory(traj1);
drive.turn(Math.toRadians(90));
drive.followTrajectory(traj2);
drive.turn(Math.toRadians(-270));
# Going Backwards
Say you want to drive your robot in reverse. TrajectoryBuilder actually makes this quite simple.
Trajectory trajectory = drive.trajectoryBuilder(new Pose2d(), true)
  .splineTo(new Vector2d(36, 36), Math.toRadians(0))
  .build();
The true boolean in the second parameter indicates that you want the bot to follow the path in reverse.
This is actually just a shorthand for passing a heading of 180 degrees into the second parameter.
The TrajectoryBuilder supports any arbitrary heading in the second parameter.
Trajectory trajectory = drive.trajectoryBuilder(new Pose2d(), Math.toRadians(90))
  .splineTo(new Vector2d(36, 36), Math.toRadians(0))
  .build();
The code above will tell your bot to follow the entire path at a 90 degree angle.
# Trajectories After Turns
If you use a tool like RRPathVisualizer, you may realize that sprinkling turns between trajectories can break the path following.
Take the following example:
Trajectory traj1 = drive.trajectoryBuilder(startPose, false)
  .forward(10)
  .build();

Trajectory traj2 = drive.trajectoryBuilder(traj1.end(), false)
  .strafeLeft(10);
  .build();

drive.followTrajectory(traj1);
drive.turn(Math.toRadians(90));
drive.followTrajectory(traj2);
You will realize that traj2 uses traj1.end() as its start pose. However, we have a drive.turn() call in between the two trajectories. So traj2 doesn't actually start in the correct orientation because of the turn. It is completely fine when using relative movements like forward() and strafeLeft(). However, using absolute movements like splineTo() and lineTo() will break, especially if you have the follower PID's turned on. How do we go about fixing this? Just add the appropriate rotation to each trajectory start like so:
Trajectory traj1 = drive.trajectoryBuilder(startPose, false)
  .forward(10)
  .build();

// We just add a 90 degree heading rotation to traj1.end()
Trajectory traj2 = drive.trajectoryBuilder(traj1.end().plus(new Pose2d(0, 0, Math.toRadians(90))), false)
  .strafeLeft(10);
  .build();

drive.followTrajectory(traj1);
drive.turn(Math.toRadians(90));
drive.followTrajectory(traj2);
Notice that we took the traj1.end() pose and simply added a new pose with x: 0, y: 0, and a 90 degree heading to simulate the turn. Just ensure that the heading in the added pose matches the turn preceding that trajectory and that x and y are left at zero.
# Slowing Down a Trajectory
Say you want to go slower for just a portion of your trajectory. Perhaps you want some fine control of an intake procedure and wish to slow down the path following. How would we go about that?
Like so:
.splineTo(
  new Vector2d(30, 30), Math.toRadians(90),
  SampleMecanumDrive.getVelocityConstraint(slowerVelocity, DriveConstants.MAX_ANG_VEL, DriveConstants.TRACK_WIDTH),
  SampleMecanumDrive.getAccelerationConstraint(DriveConstants.MAX_ACCEL)
)

// You can do the same with any TrajectoryBuilder function. Simply paste the above snippet after the standard parameters

.lineTo(
    new Vector2d(30, 30),
    SampleMecanumDrive.getVelocityConstraint(slowerVelocity, DriveConstants.MAX_ANG_VEL, DriveConstants.TRACK_WIDTH),
    SampleMecanumDrive.getAccelerationConstraint(DriveConstants.MAX_ACCEL)
)

// Example:

drive.trajectoryBuilder(startPose, false)
  // This spline is limited to 15 in/s and will be slower
  .splineTo(
    new Vector2d(30, 30), 0,
    SampleMecanumDrive.getVelocityConstraint(15, DriveConstants.MAX_ANG_VEL, DriveConstants.TRACK_WIDTH),
    SampleMecanumDrive.getAccelerationConstraint(DriveConstants.MAX_ACCEL)
  )

  // This spline will be normal speed
  .splineTo(new Vector2d(40, 40), Math.toRadians(-90))
  .build()
(This sample requires the latest version of the Road Runner Quickstart—after Apr. 15, 2021)
# Coordinate System
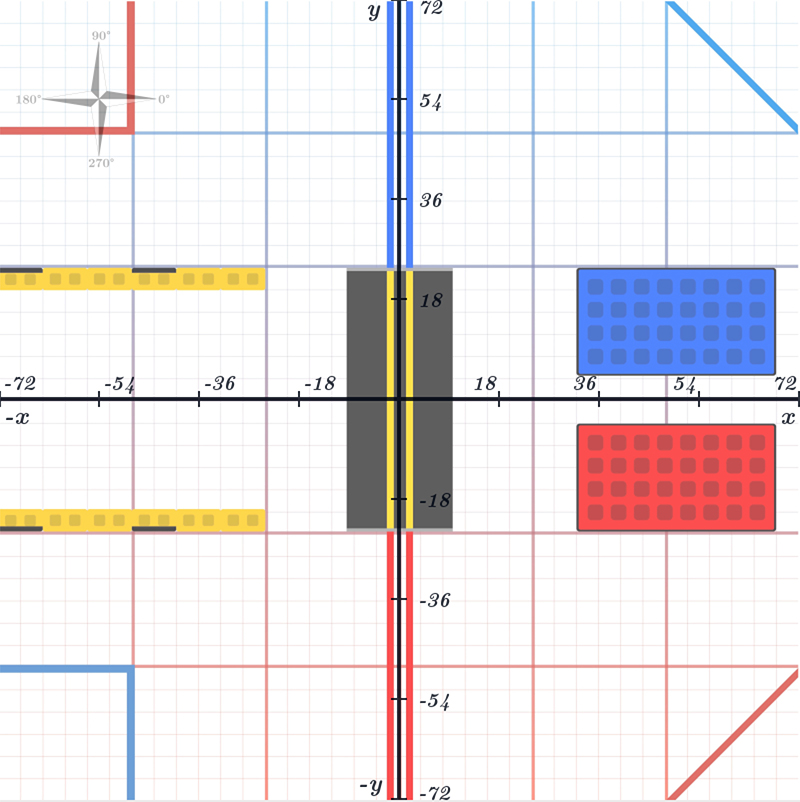
We're going to clarify the FTC coordinate system just because the official Road Runner GUI and David's RRPathVisualizer use a rotated field and it may be confusing.
The 0,0 origin of the field is at the center of the field.
The Red Alliance Station is used as the frame of reference as it is clearly defined upon every game.
The X axis extends through the origin and runs parallel with the Red Alliance Station. The X axis value increases to the right.
The Y axis extends through the origin and runs perpendicular to the Red Alliance Station. The axis value increases away from the Red Alliance Station.

Notice how the field is rotated 90 degrees relative to if we were looking at it from the audience's point of view. This is because the frame of reference is defined by the Red Alliance Station. Be mindful of this as Road Runner's official GUI and RRPathVisualizer both opt for the "proper" orientation of the field. Thus, in their maps, Y increase to the left and X increases up.
Specifications for the official FTC coordinate system can be found here (opens new window)